The Play List Project; one of the DVD-Video Format's Premiere Capabilities
DVDAfterEdit
Can Handle High-End DVD Authoring
Tasks |
The
24 Clip, Play list DVD Studio Pro 2/3/4 ® Project Template,
is implemented with DVDAfterEdit's unprecedented text editing/authoring
capability |
First,
the Navigation Functionality of the Template Project Described
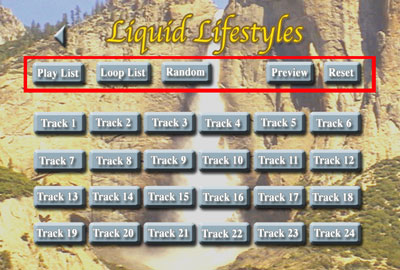
The startup menu presented to the viewer, is a "regular"
DVD Menu. Selecting any of the clips, will play the clip, and then navigation
will return to the menu.
The function buttons along the top of the screen, will; Play All the
clips, Loop All the clips, or Loop All the clips randomly (no
clip repeats until all have played). Nice.
The "Select List" button takes the viewer to the another menu,
where they build their play list, of just the selected clips. |
The number
of clips can be customized; from 2- 24 |
The
Second Menu Allows the Viewer to Define Their Play List
Once in the second menu, all the buttons' functions change, and a
"Preview", "Reset" and "Back to main menu" button are added.
The clip
buttons when selected, will now add the clip to the play list;
from 1 to all 24 clips are added to the play list, in the order (or
disorder) they're selected.
The function buttons along the top of the screen, will then Play just
the selected clips, according to their "function", just like in the
first menu.
Preview
The "Preview" button can be activated by the viewer to see a short
section, which you define, of each clip in the play list, in the
order the clips were added. Sweet.
|
Of course, you
can completely customize the menu graphics in the project, including
how and where the buttons line up
|
Duplicate
Clip Selection
If the viewer has already added a clip to the play list, and they
select the clip a second time, a menu screen appears asking if they
want to place the clip again, at the current
position in the list, or not.
Reset Play List
At any time, the viewer can activate the "Reset" button to start over,
and quickly rebuild the play list. |
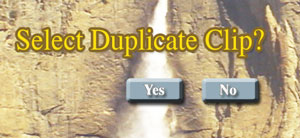
The duplicate
clip feedback screen, is yet another professional feature of the project |
|
|
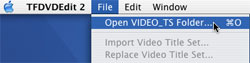
If
you would like, be sure to check out the functionality yourself. Download
the DVDAfterEdit Play List Project Demo DVD. The demo, is a zipped
VIDEO_TS folder (only 1.2 MB in size). The VIDEO_TS folder can be
written to DVD recordable, or played directly in a software DVD player.
|
|
|
Here's
How You Set Up the Template, Using
DVDAfterEdit and DVD Studio Pro 2/3/4®
|
|
| |
(btw,
you want to know the "scary" thing? :-) With a little
work in DVDAfterEdit, ANY DVD authoring system can implement the
24 Clip
Playlist Template! ) |
|
First,
What you need:
DVDAfterEdit and
DVD Studio Pro 2/3/4® |

|
DVD Studio Pro 2/3/4®, because
of it's low cost, and all the pro features it can multiplex into
a finished VIDEO_TS folder, make it the authoring system of choice,
for many, to feed DVDAfterEdit.
Without a doubt, DVD SP 2 and DVDAfterEdit equal
a $35,000 high-end DVD Authoring System.
DVD Studio Pro &r is incapable, by itself, of authoring a 24
clip Play List project, for instance.
|
|
|
What's included in the 24 Clip
Playlist Template Project download
(available to you immediately upon purchase of the program) |
|
The play list package comes with
a DVD Studio Pro 2® project, complete with proxy assets, which
you'll replace with your own menu graphics and Mpeg 2 video clips.
It's about a 4MB zip file (Stuffit Expander 7.x will open the zip
file on the Mac). |
The Steps In Detail:
|
|
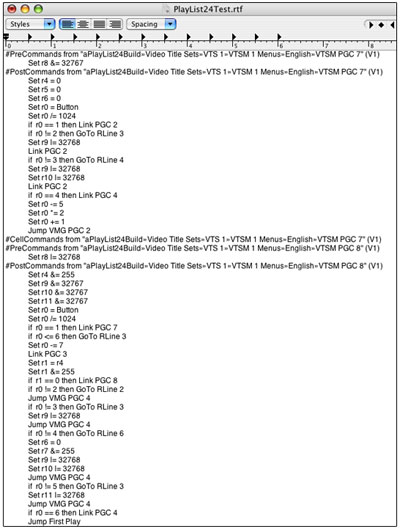
One of the most interesting text files
you'll see, is also a part of the material in the download. This text
file contains all the commands for the soon to be play list DVD, that
you'll paste into the finished DVD SP VIDEO_TS folder loaded in DVDAfterEdit
.
|
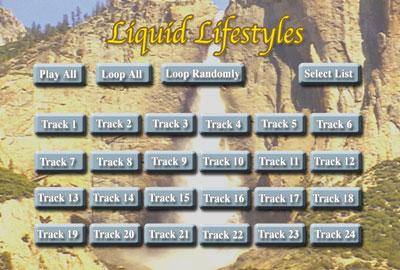
1) Asset
Preparation: Most of the work will be getting all your
clips ready; edited and then encoded to Mpeg 2. Also, you'll need 3
cool menu graphics and their simple highlight overlays designed, to replace
the proxy menus, shown above, included in the template project.
Note: the Photoshop multi-layer menu design method is not supported;
your menus
will need to be constructed with
simple highlight
overlays
(like the menu highlighting on almost ALL mass replicated professional discs).
That means the normal, unselected look of your buttons will need to be
embedded in the menu graphic, just like the proxy
menu assets are designed.
You can have from as few as several, or up to 24 video clips total in
the project. The video clips must be encoded as separate Mpeg 2
files,
as each one will replace a proxy Track asset in the DVD Studio Pro ® DVDAfterEdit
Play list Template. So once you have all your assets constructed, and
this means
you've seen your
menus
on an
NTSC
or
PAL monitor, and are satisfied,
and you've
spot
checked
all
your Mpeg
2 clips on both an NTSC or PAL TV and computer monitor, and are happy; you'll
load the template project. |
2) Load
the 24 Clip Template Project into DVD Studio Pro 2/3®: What
will come in when you load the Template Project are the assets that
make up the Play list Demo DVD. The task now
is
to prepare the project with your own assets and the number of clips
you're planning on giving the user control of, up to a total of 24.
3) Prepare the Template Project to control less
than 24 clips: If you have fewer clips to control,
you'll need to delete the Tracks you won't be using, and remove
the menu buttons
(hotspots)
that
reference
them,
in the
two
menus that
do.
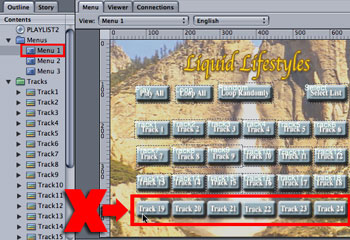
Delete the menu buttons that jump to Tracks you don't need.
To delete the menu button commands for the Tracks you won't be using,
click on the first menu in the Project's "Outline" view, and select the "Menu"
tab to get to the menu and it's buttons.
Select
the last
button
first, the one that targets Track24, and then hit the delete key. Repeat
delete for all the Tracks you won't be using, in reverse order,
Track23, 22, 21,
etc. |
DVD Studio Pro ®will let you delete menu buttons that are still
assigned to jump to Tracks, unlike the accidental delete protection
found in DVD SP 1.5.
|
Important: Always
delete the last buttons first in the template menus when you're going
to control fewer than 24 clips. The remaining buttons, need to keep their
order
position
to preserve their "System
Parameter" values;
so the pasted commands work later on when the commands in the template
text file are pasted in DVDAfterEdit.
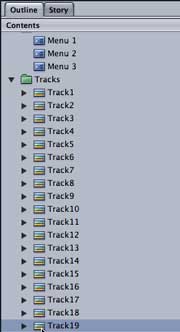
Delete the Tracks you won't use.
After you've removed the
buttons targeting the not-to-be-used Tracks in both menus, it's
a good time to go into the Outline View and delete the extraneous
Tracks (or you can delete these Tracks first, and then the menu buttons,
of course).
That's easily accomplished in the Outline view. Just click on Track24
and delete it and the rest you won't use in this particular project, in
descending order.
So now, you will have the two provided template menus and their buttons,
targeting the remaining Tracks, with no "left over" button hotspots in the
menus (make sure you delete the same number of menu button hotspots as Tracks,
in other words). |
|
 |
Replace
the Assets in the Menus and Tracks with your own
When all's ready, it's time to import your own assets into the template
project loaded, and exchange them with the proxy assets.
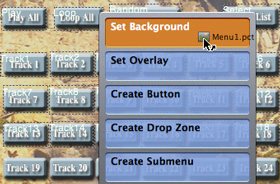
Switching out the menu assets
DVD Studio Pro ® makes it easy (not as easy as DVD SP 1.5, though)
to replace your assets. For the menus, simply drag your imported menu over
the menu editor, and hold until the options appear, and let go; the menu
background is placed. Then assign your specially designed simple
highlights
in the Menu Inspector.
Your menus can be completely different than the included proxies. If you've
got your buttons arranged differently, that's fine. You can drag the button
hotspots, and arrange their sizes, etc., over where you've placed your
own. Just make sure the button numbers don't change for each function/Track. |
|
 |
Replacing the Track assets
For the Tracks, you'll go into each one, select the proxy asset, and
delete it; and then drag the Mpeg 2 clip in you want
to be
that
Track
number.
There's
no need
to rename the Tracks. Keeping them named from "Track1" to "Track..x"
will help you know the order you're lining up the clips for playback
when the Play list Project is in play all, or loop all mode.
Each Track can have one audio stream and as many chapter markers as
you need (you can move or delete the marker that came in with the Template,
to suit your needs). Future versions of the Template project might support
a special features menu that allows the viewer to select among multiple
audio and subtitle streams for the clips (if we're all
real
nice,
Larry
Applegate
might be happy to accomodate. :-) Or, in a short period, you'll be
able to add the special features menus in the Template Project and add to
the programming in the Text file to link them up to the rest of the project,
on your own (although I think we should all still be real nice to
Larry! :-). |
Create the preview Story for each Track
One of the cool features of the Play List Template, is the ability to
view a pre-defined section of each clip in the play list,
before choosing how to play the list. This helps the viewer make sure
they've
got the
right clips, in the order they want. This preview of a very short representative
section of each clp is accomplished with the Story feature of DVD Studio
Pro 2/3 ®. For each Track, you can define a Story for that representive
preview section of the clip. The Story can be anywhere in the clip, and
you don't have to set it's end jump in the Connections Window (the Text
file with all the commands have that authoring chore already done for
you).
The Play List Template comes with the first marker defined in each Track,
as a single marker Story; which you can easily change which marker will
be the Stories start (the next marker reached in the Track, and NOT included
in the Story marker list, will be the Stories "out point",
as you may know).
Build the Project
After you've completed the above tasks; you've deleted all the menu buttons
and the Tracks you won't be using in this particular project, and replaced
all the assets with your own. And then defined the preview Story for each
Track, you can build the project. There's no need to author anything
in DVD Studio Pro ®.
|
DVDAfterEdit
's Extensive Text Authoring/Editing Copy & Paste, etc. Capability |
Copying
and Pasting the Template commands from the text file, into DVDAfterEdit
How the Template was created
Included in the 24 clip download package is a nifty text file that contains
references to all the project elements and all the authoring that jumps,
links, and calls the disc's navigation between them.
To get an appreciation of DVDAfterEdit's Text edting/authoring capability
(as well as for the programs complete DVD spec navigation command set),
know, that the way this DVD Studio Pro, 24 clip template was set up
for you, is Larry Applegate authored the whole thing in DVDAfterEdit (somewhere
between the California's coast and the Panama Canal, on his vacation!).
Only the assets were set up like you're doing for your own project. No
authoring was done in DVD Studio Pro ®.
After the multiplex, Larry authored the project entirely in DVDAfterEdit
, and then used the programs "Copy All PGC commands as text" to create
the text file you'll be pasting in. Ultra cool. No other
DVD authoring system supports this capability.
Pasting in the commands from the text file
So now, your not-yet-authored project has been
multiplexed into a VIDEO_TS folder by DVD Studio Pro &r, and is sitting
on the hard drive ready to be loaded into the program.
|
Here's the very botton of DVDAfterEdit
's powerful and stuffed-to-the-gills with options (there I go again
:-) Edit menu.
 DVDAfterEdit
's Text authoring capability ramifications are just dawning on even
the program creators, close collaborators and early users. The feature
has dozens of uses, from saving favorite command strings for use in
your projects, saving the command structure for ANY DVD, all the way
to fully authoring a DVD, or a portion of the DVD, right in the text file! DVDAfterEdit
's Text authoring capability ramifications are just dawning on even
the program creators, close collaborators and early users. The feature
has dozens of uses, from saving favorite command strings for use in
your projects, saving the command structure for ANY DVD, all the way
to fully authoring a DVD, or a portion of the DVD, right in the text file!
|
|
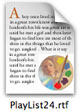
| Once your project is in DVDAfterEdit, it's
simply a matter of opening up the included text file
containing all the commands of the Template (a portion of the file is
shown at the right), selecting the contents of the entire file, and pasting
them into the Mac's clipboard. |
|
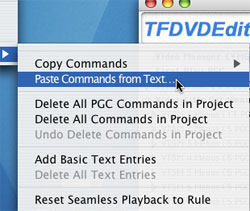
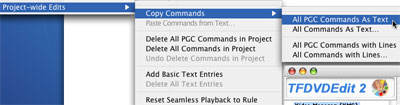
Once all the commands are on the clipboard,
you can then go into DVDAfterEdit's Edit Menu and choose "Project-wide
Edits/Paste Commands from Text". Done.
You can now preview your Play List project in the Apple DVD player. |
DVDAfterEdit
's Text Authoring/Editing Feature is Unprecedented |
Preparing the PlayList command Text file if you
have fewer than 24 clips to control
To modify the text file for fewer than 24 clips, please do the following
(this procedure makes for a "clean" VIDEO_TS folder, with no commands
that reference non existent targets if less than 24 clips were used,
and will keep DVDAfterEdit's ever vigilant command verification routines
from barking at you! :-):
1. First, it's good to get rid of the commands in the project that jump
to nonexistent titles. You'll find all these
command lines in a single pre command area of VMG PGC 2, Each Track
(Video Title Set, or VTS) has two titles, btw; one for the clip, and
one for the preview Story.
For example, Track 1 (which is listed as VTS 1, in DVDAfterEdit's Left
Pane) uses TT 1 (TT stands for "Title") for the whole clip
and TT2 for the preview Story. VTS 24 uses TT 47 for the whole clip and
TT 48 (again, the second title in each VTS is the preview Story for each
Track. You can open up each VTS in the Left Pane and see the two PGCs
in them; their TT numbers are indicated next to them).
Delete the jumps to the extra titles in the Text file. For example,
if you have 20 tracks, delete jumps to titles 41 through 48. You can
do a block delete; select the first title to delete and then shift click
on the last title, then delete.
Btw, you don't really have to
do this, as the non existent VTS's and titles will never play (the commands
will never get executed. But again, it's just good to have a tidy VIDEO_TS
folder).
2. The next thing you'll want to do is to "tell" the programming
how many Tracks (VTS's) you have in the project. The particular
command line to change is the last command line in the pre commands of
VTSM PGC 2.
Here's the command line:
Set r4 = $18 (you can do a "find" in
the text editor's edit menu, to get right to the command line). Change this "$18" to
the correct number of Tracks. You can use decimal notation.
So, "Set r4 = 20" would be the setting for 20 Tracks in the project
(the little "r"stands for register, or GPRM 4).
Once you have modified the text file, do a select all and then copy
(to the clipboard).
Then go back into DVDAfterEdit, where your built Play List project is
sitting, and select something (PGC, VTS, etc.) in the Left Pane (this
will activate the Edit menu so you can paste the text files contents
from the clipboard).
|
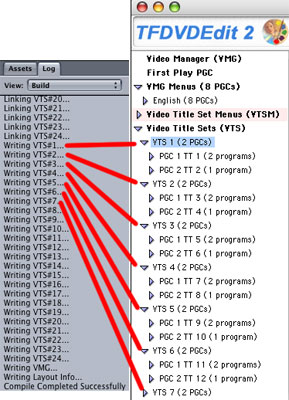
Shown is DVD Studio Pro 2's build
log, turning the Tracks into "VTSs"(Video Title Set), which is how
they'll appear in DVDAfterEdit's "Left Pane". Notice the PGCs (Program Chains)
under each of the VTS's in DVDAfterEdit? 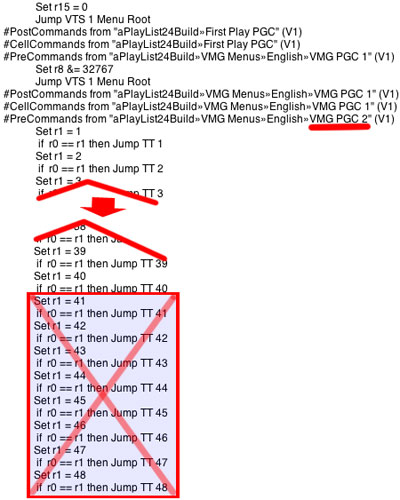
|
Then in the DVDAfterEdit's Edit Menu, as mentioned before, choose "Project-wide
Edits, Paste Commands from Text...".
You will get the following warning message:
"x.. amount of command sets from the clipboard can
not be applied to the current project because the objects that they
reference do not exist in this project", where "x..." is
some number. Don't worry, this just means you used less than 24 Tracks,
and their Track (VTS and title PGC) references in this text file (we
deleted the commands that reference these non existant Tracks in the
text file, but not the actual Tracks, i.e. VTS's and PGCs listed in
the text file), that won't get pasted in, because there's nowhere to
paste them.
No biggie. This just means these entities won't get pasted in, which
is OK, because they don't exist (nothing like something a do about nothing,
eh? :-).
If this is the only error message, press "Continue" and the
paste will succeed.
Alternately (if you don't like to see error messages :-), you can delete
the the extra, or unused references to Video Title Sets (VTS), and the
PGCs contained in them, from the end of this text file, since the title
set commands are in title number sequence. But it's perfectly
fine to paste this whole file right on in, and let DVDAfterEdit tell those
unused VTS's and commands they're not needed.
After you've pasted the Text file in, choose Save from DVDAfterEdit's
file menu, and you can immediately open up the VIDEO_TS folder in Apple
DVD Player and take her for a spin. Done.
So that's it. Not too bad, huh?
Of course, if you have any questions or problems, we will help you out
in the support discussions. |
|